Wednesday, April 23, 2014

Pretty Peacock Amigurumi!

Another gift for one of my girls! My friend Melissa, who I've known practically since birth, has a very unique style and a lot of it is inspired by peacocks. Everything peacock reminds me of her. So this was part of her Christmas present this year, along with a matching scarf (which I think I forgot to take a picture of before giving it to her). I love the fancy eye-lashy googly eyes I found for her; they fit this proud and pretty little lady so well! 

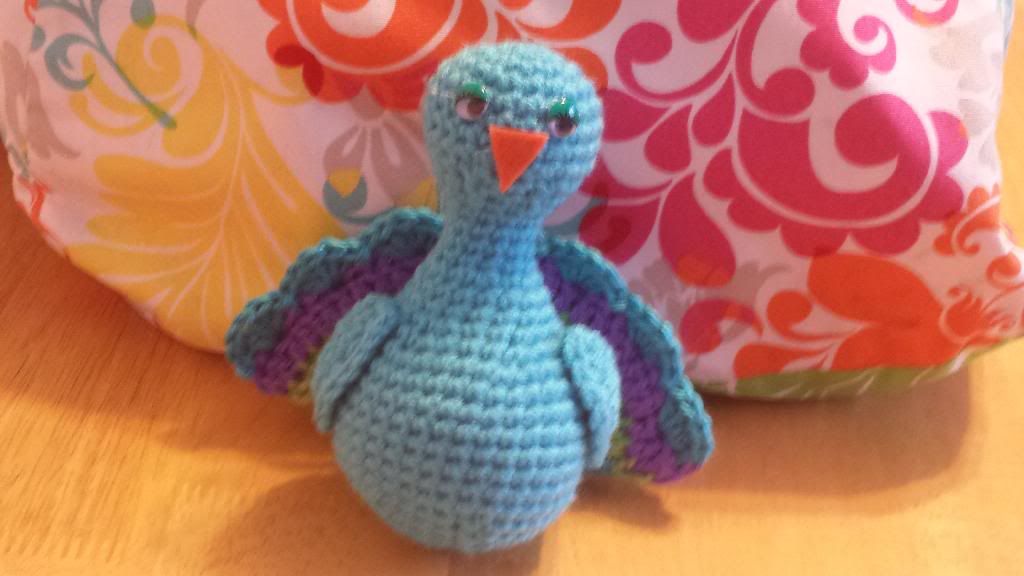
Yarn: Worsted weight yarn in light blue, lime green, and light purple. I used Red Heart for the body and wings, and Caron Simply Soft Neon colors for the tail.
Hook: Size G or H depending on your tension. You may want to use the smaller hook for the tail, since Simply Soft is a little thinner than regular worsted weight. 
Other materials: A small orange piece of felt cut into a triangle, googly eyes (I found the cute eye-lashy ones at Michael’s!), hot glue gun and glue, needle to sew wings and tail on. 

Body (using light blue Red Heart yarn)

Row 1: Ch 2, 6 sc in first stitch
Row 2: 2 sc in each st around
Row 3: *2 sc in first stitch, 1 sc in next st* repeat around 
Row 4: *2 sc in first stitch, 1 sc in next 2 sts* repeat around 
Rows 5-8: sc around 
Row 9: *Sc2tog, sc in next 2 sts* repeat around 
Row 10: *Sc2tog, sc in next st* repeat around 
Rows 11-15: sc around 
Row 16: *2 sc in first st, sc in next st* repeat around 
Row 17 and 18: sc around 
Row 19: *2 sc in first st, 1 sc in next 2 sts* repeat around 
Row 20: *2 sc in first st, 1 sc in next 3 sts* repeat around 
Row 21: *2 sc in first st, 1 sc in next 4 sts* repeat around 
Rows 22-28: sc around 
Row 29: *Sc2tog, sc in next 4 sts* repeat around (Start stuffing!)
Row 30: *Sc2tog, sc in next 3 sts* repeat around 
Row 31: *Sc2tog, sc in next 2 sts* repeat around 
Row 32: *Sc2tog, sc in next st* repeat around 
Row 33: Sc2tog all around 
Sew hole closed and weave in yarn end. 

Wings (still using light blue Red Heart yarn)

Row 1: Ch 2, 6 sc in first st
Row 2: 2 sc in each st around
Row 3: *2 sc in first st, sc in next st* repeat around
Row 4: *2 sc in first st, sc in next 2 sts* repeat around 
Row 5: Fold circle in half with wrong side inside, hold stitches parallel and sc along edge. Sew to body. 

Tail (start with Simply soft blue)

Row 1: Ch 3, 9 dc in first ch, join. (switch to green yarn)
Row 2: Ch 2, dc in same st, 2 dc in each stitch around, join. (switch to purple)
Row 3: Ch 2, dc in same st, dc in next st, *2 dc in st, dc in next st* repeat around. (switch to blue)
Row 4: Ch 2, dc in same st, dc in next 2 sts, *2 dc in st, dc in next 2 sts* repeat around. (switch to green)
Row 5: Ch 2, dc in same st, dc in next 3 sts, *2 dc in st, dc in next 3 sts* repeat around. (switch to purple)
Row 6: Ch 2, dc in same st, dc in next 4 sts, *2 dc in st, dc in next 4 sts* repeat around. (switch to blue)
Row 7: Fold circle in half with wrong side inside, starting thread in the corner, making all stitches parallel. *Skip 1 stitch, 5 dc in next st, skip 1 stitch, slip stitch in next stitch* repeat to the end. Finish off and weave in end. Sew center to the back of the body. 
Hot glue the eyes and felt beak onto the face. Done! 


Tuesday, December 31, 2013

"He's her lobster!"


Any other 90's kids remember that episode of Friends? Rachel and Ross? No? Apparently lobsters mate for life. Awwwww. Okay, moving on. 

Another Christmas present. One of my best friends that used to be my room mate (the same girl I made the owl for, actually), recently moved out with my other best friend room mate that got married and now has her own house. She's a quirky one and entertainingly random. She has a lobster shirt, a lobster pillow, and might even have a lobster blanket. And I have no idea why. So I decided to add to her lobster collection while throwing in the cute meaning of us being friends forever and that I love her (hence the adorable heart shaped claws). Awww. 

Anyway, this heart stealing little guy would make an adorable Valentine's Day present for YOUR lobster. (hint hint!) 

Love Lobster Amigurumi


Yarn: worsted weight red yarn; I used Red Heart.
Hook: G or H, depending on your tightness of stitches. If you’re a relaxed stitcher, I would go with G. I’m an aggressive stitcher, so I used an H.
Other materials: stuffing, buttons or whatever you prefer to make eyes, darning needle and embroidery needle with thread (if you’re using buttons). Sewing pins and a stitch marker make this MUCH easier.

Lobster body
Row 1: Ch 2, 6 sc in first st*
Row 2: 2 sc in each st around
Row 3: * 2sc, 1 sc in next st * repeat around
Row 4: * 2 sc, 1 sc in next 2 sts * repeat around
Row 5: *2 sc, 1 sc in next 3 sts * repeat around
Row 6: * 2 sc, 1 sc in next 4 sts * repeat around
Rows 7-17: sc around
Row 18: * sc2tog, sc in next 4 sts * repeat around
Row 19: sc around
Row 20: * sc2tog, sc in next 3 sts * repeat around
Rows 21-24: sc around
Row 25: * sc2tog, sc in next 2 sts * repeat around
Rows 26-28: sc around
Row 29: * 2sc in first st, sc in next st * repeat around
Rows 30-32: sc around. Stuff your lobster!
Row 33: Pinch the circle flat so that your starting stitch is on the right and the stitches are lined up so you can crochet the top and bottom together into a line. For the next stitches, you are going to put your hook through the top stitch AND bottom stitch as one, so your lobster will be crocheted shut.
Skip 2 stitches, 5 dc in 3rd stitch. Skip 1 stitch, slip stitch in next stitch.
Skip 1 stitch, 5 dc in next st, skip 1 stitch, slip stitch in next stitch.
Skip 1 stitch, 5 dc in next stitch, skip 1 stitch, slip stitch in last stitch. You should have formed 3 shell stitches and the tail of your lobster should be flat. Bind off and hide yarn tail.

Heart-shaped claws
For the heart-shaped claws, you are going to make four “bumps” for the tops of the hearts. So there are two for each claw. For each claw, one “bump” will have a tail of yarn and the other bump will remain attached to your working yarn while you sew the first bump to the active one. So you will make one bump, leave a tail and cut the yarn, and then make a second one, leave attached, use tail from the first one to sew to the second one, and then return to your active yarn to finish crocheting around both bumps to complete the heart. I hope this makes sense!

Row 1: Ch 2, 6 sc in first ch
Row 2: 2 sc in each st around
Row 3: * 2 sc in first st, 1 sc in next st * repeat around
Rows 4 and 5: sc around
(If you’re working on your first bump, BO and leave a tail. If the second one, leave the active yarn attached.)
Using the tail of your first bump, line up the end of the first bump with the last active stitch of the second bump. Whip stitch 4 stitches together and weave in yarn tail. Return to your active yarn.
Row 6: sc one row around both circles, forming one big circle to work with. The number of stitches you create will probably vary. I think I ended up with 33. It’s okay if yours is different, the end product will still look the same.
Rows 7 and 8: sc around
Row 9: * sc2tog, sc in next 4 sts * repeat around, if you have remaining stitches just sc until the end
Row 10: sc around
Row 11: * sc2tog, sc in next 2 sts * repeat around, again sc in any remaining stitches
Row 12: * sc2tog, sc in next st * repeat around, sc in remaining stitches if any
Row 13: sc around. Stuff your claw now, because it’s going to get tight after this!
Row 14: sc2tog all around
Rows 15 and 16: sc around
BO, leaving tail to use to sew claws to the sides of the lobster’s body.


I sewed on my button eyes first so I could position the claws on the body in relation to them. I used sewing pins to position the claws and then used the tail of yarn to whipstitch them onto the body. Enjoy!! 

Snowman Amigurumi

Snowman Amigurumi


This little lady was a Christmas present for my mom for Christmas. She collects anything snowman. She’s also one of those people who appreciates the little things that took time and not money. I thought this fit the bill quite nicely.

Yarn: worsted weight in white (I used a bit of a skein of Caron One Pound that I had lying around)
For the hat and scarf – I used a shiny pink worsted weight yarn that was on sale years ago at AC Moore. It’s similar to Simply Soft. I thought the difference in texture would really make the snowman’s accessories pop.

Hook: G or H, depending on how tightly you crochet. I use an H because my stitches are tight anyway, but if you’re relaxed, I would recommend a G.
Other materials: Stuffing, darning needle, buttons for the eyes, and thread to sew on the buttons.

Row 1: Ch 2, 6 sc in first ch. Join or insert stitch marker to keep track of your rows.
Row 2: 2 sc in each st around.
Row 3: *2 sc in first st, 1 sc in next st * repeat around.
Row 4: *2 sc in first st, 1 sc in next 2 sts * repeat around.
Row 5: * 2 sc in first st, 1 sc in next 3 sts * repeat around.
Rows 6 – 11: sc around.
Row 12: * sc2tog, sc in next 3 sts * repeat around.
Row 13: * sc2tog, sc in next 2 sts * repeat around.
Row 14: * 2 sc in first st, sc in next 2 sts * repeat around.
Row 15: * 2 sc in first st, sc in next 3 sts * repeat around.
Row 16: * 2 sc in first st, sc in next 4 sts * repeat around.
Rows 17 – 25: sc around.
(Around this row, I would start packing the body with stuffing.)
Row 26: * sc2tog, sc in next 4 sts * repeat around.
Row 27: * sc2tog, sc in next 3 sts * repeat around.
Row 28: * sc2tog, sc in next 2 sts * repeat around.
Row 29: * sc2tog, sc in next st * repeat around.
Row 30: * sc2tog * repeat around. Leave tail of yarn. Use darning needle to run yarn tail through remaining stitches and sew shut. I would recommend not sewing the button eyes on just yet. I waited until I was finished the hat and scarf so I could try them on the body to see exactly where the eyes should be.

Snowman’s Hat (with the shiny pink yarn)

Row 1: Ch 3, 9 dc in first ch, join.
Row 2: Ch 2, 1 dc in same st as ch, 2 dc in each st around. Join.
Row 3: Ch 2, 1 dc in same st as ch, 1 dc in next st, *2 dc in next st, 1 dc in next st* around. Join.
Row 4: Ch 2, dc around. Join.
Row 5: Ch 2, dc around. Join.
Row 6: Turn the hat so you’re stitching in the opposite direction (just like when you’re doing rows on a regular pattern rather than circular, so the front of these stitches will be on the inside of the hat). Ch 2, dc in back loops all around. Join and bind off. Flip this row up to create the brim of the hat.

Snowman’s Scarf (with the shiny pink yarn)
Row 1: Ch 7, dc in 3rd ch from hook, dc across.
Rows 2 - ?: Turn, ch 2, dc across. I don’t actually know how many rows I did, I just kept trying it on the snowman until I could tie it around his neck and it hung down nicely.


Let your imagination run wild with this one. Use this simple template to create all kinds of unique snowmen! 

Sunday, December 26, 2010

Owl Amigurumi for Kim =)

Here is a little owl that I whipped up as a Christmas present for my truly unique and quirky friend Kim. This little guy only took 2 days to make!


Crochet Owl Pattern
The body of this owl is worked from the bottom up. It starts as a circle and is crocheted in rounds. At the top you will sew the opening together flat to create owl-like “ears.”
Yarn:
Caron One Pounder in “Nutmeg”
Small amounts of white, turquoise, and dark brown

Hook: H 5.0 mm (for worsted weight yarn – stitches need to be solid!)
Stuffing, Darning needle

Owl Body

Row 1: Ch 2, 6 sc in first ch (6 st)
Row 2: 2 sc in each st around (12 st)
Row 3: *sc, 2sc in next st* around (18 st)
Row 4: *sc in 2 sts, 2 sc in 3rd st* around (24 st)
Row 5: *sc in 3 sts, 2 sc in 4th st* around (30 st)
Row 6: *sc in 4 sts, 2 sc in 5th st* around (36 st)
Row 7-24: sc around
-this is the end (or top) of the body but DO NOT end yarn!!! Leave yarn attached while you make and attach the eyes, belly, and wings. By doing this BEFORE you stuff and sew the body, you will save yourself a lot of trouble with sewing on parts and hiding ends.-

Owl Eyes (make 2)

Row 1: with white yarn, ch 2, 6 sc in first ch. (6 sts)
Row 2: 2 sc in each st around (12 sts)
Row 3: *sc, 2 sc in next st* around (18 sts)
End, leaving a long tail to sew eye onto owl.
Using a darning needle and turquoise yarn, embroider middle of eye over first round of stitches.

Owl Beak (dark brown yarn)
Row 1: Ch 3, skip 3rd ch and sc in 2 first chains. Turn.
Row 2: ch 1, 1 decrease single crochet. Tie off, leave a small tail to sew beak onto owl.

Owl Wings (dark brown yarn) (make 2)
Row 1: Ch 2, 6 sc in first ch. (6 sts)
Row 2: 2 sc in each st around. (12 sts)
Row 3: sc around
Row 4: *sc, 2sc in next st* around. (18 sts) end, leaving long tail to sew to owl.

After sewing on all the pieces, stuff the owl.
Replace hook back into loop of nutmeg yarn of top of owl that wasn’t ended. Pinch the top of the owl together so that the hook is on the right hand side and the stitches on each side line up. You should be able to count about 17 stitches across.
Sc across 3 stitches. On the 4th and 5th stitches, do a single crochet decrease. Do the same on the 5th and 4th stitch from the end of the row. End and sew in the end.


Merry Christmas and happy crocheting! =]

Sunday, December 5, 2010

Shelly the Egg Amigurumi Crochet Pattern


Supplies:
Small amount of worsted weight yarn in your choice of color (I used Lion Brand Cotton in white)
Crochet hook, size F if you tend to have loose tension, G or H if you crochet tightly
Black embroidery thread and small amount of pink felt
Tapestry needle and embroidery needle

*This pattern is worked in the round. It is your choice to join or not to join your rounds. To join, simply finish the row, slipstitch to the first stitch that row, and chain one to begin next row. If you are not joining, do the first stitch of the next row, and use a stitch marker to mark it, so you don’t lose your place. ** indicate to repeat instructions all across that row.

Row 1: Ch 2, 6 sc in 1st ch (6 st)
Row 2: 2sc in each st around (12 st)
Row 3: *sc, 2sc in next stitch* around (18 st)
Row 4: *sc in 2 st, 2sc in 3rd st* around (24 st)
Row 5: *sc in 3 st, 2sc in 4th st* around (30 st)
Row 6: sc around
Row 7: sc around
Row 8: *sc in 4 sts, 2sc in 5th st* around (36 st)
Rows 9-12: sc around
Row 13: *sc in 4 sts, sc2tog (a decrease) in 5th st* (30 st)
Rows 14 and 15: sc around
Row 16: *sc in 3 st, sc2tog in 4th st* (24 st)
Rows 17 and 18: sc around ***now would be a good time to start stuffing!***
Row 19: *sc in 2 st, sc2tog in 3rd st* (18 st)
Row 20: *sc, sc2tog* (12 st)
Row 21: sc2tog all around. Finish off, use tapestry needle and weave tail in and out of remaining stitches and pull closed. Weave end through stitches on body to hide.

Tips for Embroidering the Face:
·        The backstitch would be easiest to make the face. When you start, leave a tail sticking out of where you first inserted the needle. When you’re finished embroidering the face, end on the same point as where you started. Tie the two ends in a knot, and use a super small crochet hook (like a D) to pull the two ends into the body to hide.
·        Use a button to trace round circles on the pink felt. I just simply glued them onto the face; Elmer’s glue works surprisingly well if you let it sit completely still until it’s all dried.

Dachshund Amigurumi Crochet Pattern


Supplies
One skein Red Heart Super Saver in Black
Small amount of Red Heart Super Saver in Warm Brown
Size F or G Crochet hook (depending on your tension)
Polyfil or other type of stuffing
Tapestry needle
Small amounts of black and white felt
Black embroidery floss and embroidery needle

All parts of this pattern are worked in the round. It is your choice whether to join your rounds or to work in a continuous spiral. I highly recommend a stitch marker (this can be a safety pin, a swivel clip keychain, or just a piece of scrap yarn) to keep track of your rows if you work in a spiral.

Dachshund Body (in black)
Row 1: Ch 2, 6sc in first ch. (6 sc)
Row 2: 2sc in each st around. (12 sc)
Row 3: *sc, 2sc in next st* around. (18 sc)
Row 4: *sc in next 2 sts, 2sc in 3rd* around. (24 sc)
Row 5: *sc in next 3 sts, 2sc in 4th* around. (30 sc)
Row 6: *sc in next 4 sts, 2sc in 5th* around. (36 sc)
Rows 7-40: sc around. (36 sc)
Row 41: *sc in next 4 sts, sc2tog* around. (30 sc)
Row 42: *sc in next 3 sts, sc2tog* around. (24 sc)
Row 43: *sc in next 2 sts, sc2tog* around. (18 sc)
Row 44: *sc, sc2tog* around. (12 sc)
Row 45: sc2tog around. (6 sc)
Finish off, weave tail through remaining stitches and pull closed. Weave tail through surrounding stitches to secure and hide.

Dachshund Front Legs (Make Two)
Row 1 (starting with “warm brown”): Ch 2, 6 sc in first ch. (6 sc)
Row 2: 2sc in each st around. (12 sc)
Row 3: *sc, 2sc in next st* around. (18 sc)
Rows 4-6: sc around. (18 sc)
Row 7 (switch to black): sc around. (18 sc)
Rows 8-11: sc around. (18 sc)
Finish off, leaving long enough tail to sew to body.


Dachshund’s Back Legs (Make Two)
Row 1 (starting with warm brown): Ch 2, 6sc in first ch. (6 sc)
Row 2: 2sc in each st around. (12 sc)
Row 3: *sc, 2sc in next st* around. *(18 sc)
Rows 4-6: sc around. (18 sc)
Row 7 (switch to black): sc around. (18 sc)
Row 8: 2sc in first 9 sts, sc in remaining 9 sts. (27 sc)
Rows 9-11: sc around. (27 sc)
Finish off, leaving long enough tail to sew to body.

Dachshund’s Head
Row 1: Ch 2, 6sc in first ch. (6 sc)
Row 2: 2sc in each st around. (12 sc)
Row 3: *sc, 2sc in next st* around. (18 sc)
Row 4: *sc in next 2 sts, 2sc in 3rd st* around. (24 sc)
Row 5: *sc in next 3 sts, 2sc in 4th st* around. (30 sc)
Row 6: sc around. (30 sc)
Row 7: *sc in next 4 sts, 2sc in 5th st* around. (36 sc)
Rows 8-14: sc around. (36 sc)
Row 15: *sc in next 4 sts, sc2tog* around. (30 sc)
Row 16 and 17: sc around. (30 sc)
Finish off, leaving long enough tail to sew to body.

Dachshund’s Snout
Row 1 (starting with warm brown): Ch 2, 6sc in first ch. (6 sc)
Row 2: 2sc in each st around. (12 sc)
Row 3: sc around. (12 sc)
Row 4: *sc, 2sc in next st* around. (18 sc)
Row 5: sc around. (18 sc)
Row 6 (switch to black): sc around. (18 sc)
Row 7: sc around. (18 sc)
Row 8: *sc in next 2 sts, 2sc in 3rd st* around. (24 sc)
Row 9: sc around. (24 sc)
Finish off, leaving long enough tail to sew to head.

Dachshund’s Ears (Make Two)
Row 1: Ch 2, 6sc in first ch. (6 sc)
Row 2: 2sc in each st around. (12 sc)
Row 3 and 4: sc around. (12 sc)
Row 5: *sc, 2sc in next st* around. (18 sc)
Rows 6-13: sc around. (18 sc)
Slip stitch to next st and end. Leave long enough tail to sew to head. Flatten before attaching to head (refer to picture).


Dachshund’s Tail
Row 1: ch 2, 6sc in first ch. (6 sc)
Rows 2-10: sc around. (6 sc)
Slip stitch to next st, finish off, leaving long enough tail to sew to body. (*Hint: to stuff tail, try using a thin pen, or even the blunt end of a larger crochet hook to gently push the stuffing into the tail.)

Dachshund’s Face
  • For eyes, cut out 2 ovals from the white felt. Cut 2 circles that are about half the size of the white ovals from the black felt. Glue (Elmer’s glue or fabric glue is just fine) the white ovals to the face first, and then glue the black circles on top, like in photograph.
  • For nose, use embroidery thread to do a satin stitch on the snout.

Pug Amigurumi Crochet Pattern


Supplies:
One skein Red Heart Super Saver in Buff (this uses about half a skein)
Small amount of Red Heart Super Saver in Coffee
Crochet hook size G or H (depending on your tension)
Tapestry needle
Polyfil or other stuffing
Black embroidery thread
Embroidery needle
Small amount of black and white felt (for eyes)

Each part of this pattern is worked in the round. It is your choice whether to join your rounds or not. ** indicates to repeat pattern for entire row.

Pug’s Body
Row 1: Ch 2, 6sc in 1st ch (6 sts)
Row 2: 2sc in each st around (12 sts)
Row 3: *sc, 2sc in next st* around (18 sts)
Row 4: *sc in next 2 sts, 2sc in 3rd st* (24 sts)
Row 5: *sc in next 3 sts, 2sc in 4th st* (30 sts)
Row 6: *sc in next 4 sts, 2sc in 5th st* (36 sts)
Row 7: *sc in next 5 sts, 2sch in 6th st* (42 sts)
Rows 8-29: sc around (42 sts)
Row 30: *sc in next 5sts, sc2tog* (36 sts)
Row 31: *sc in next 4 sts, sc2tog* (30 sts) *now would be a good time to start stuffing!
Row 32: *sc in next 3 sts, sc2tog* (24 sts)
Row 33: *sc in next 2 sts, sc2tog* (18 sts)
Row 34: *sc, sc2tog* (12 sts)
Row 35: sc2tog around (6 sts)
Finish off, use tapestry needle to weave tail through remaining stitches and pull closed. Hide tail by sewing into surrounding stitches.

Pug’s Head (in “Buff”)
Row 1: Ch 2, 6 sc in 1st ch. (6 sts)
Row 2: 2sc in each st around (12 sts)
Row 3: *sc, 2sc in next st* (18 sts)
Row 4: *sc in next 2 sts, 2sc in 3rd st* (24 sts)
Row 5: *sc in next 3 sts, 2sc in 4th st* (30 sts)
Row 6: *sc in next 4 sts, 2sc in 5th st* (36 sts)
Rows 7-14: sc around (36 sts)
Row 15: *sc in next 4 sts, sc2tog* (30 sts)
Row 16: sc around
Finish off, leaving a long enough tail to sew to body.
*Tip: When sewing to body, spread neck out so it blends into the body, and sew as close to the front of body as possible (so there’s no “lump” below the neck).

Pug’s Front Legs (Make 2, in “Buff”)
Row 1: Ch 2, 6sc in 1st ch. (6 sts)
Row 2: 2sc in each st around. (12 sts)
Rows 3-13: sc around.
Finish off, leaving tail long enough to sew to body.

Pug’s Back Legs (Make 2, in “Buff”)
Row 1: Ch 2, 6sc in 1st ch. (6 sts)
Row 2: 2sc in each st around. (12 sts)
Rows 3-9: sc around. (12 sts)
Row 10: 2sc in each of first 6 sts, sc in remaining 6 sts. (18 sts)
Rows 11-13: sc around. (18 sts)
Finish off, leaving long enough tail to sew to body.

Pug’s Snout (with “Coffee”)
Row 1: Ch 2, 6 sc in 1st ch. (6 sts)
Row 2: 2sc in each st around. (12 sts)
Row 3: *sc, 2sc in next st* (18 sts)
Row 4: sc around. (18 sts)
Finish off, leaving long enough tail to sew to face.
*Tip: when sewing to face, I used just a little bit of stuffing so it would protrude a LITTLE bit. Use black embroidery thread to create a nose and mouth.

Pug’s Ears (Make 2, with “Coffee”)
Row 1: Ch 2, 3sc in first ch. (do not join, this is not done in the round)
Row 2: Ch 1, turn, 3 sc across.
Row 3: Ch 1, turn, 2sc in first st, sc in 2nd, 2sc in last st (5 sts)
Row 4: Ch 1, turn, 5 sc across.
Finish off, leaving tail to sew to head.

Pug’s Eyes (Make 2, with “Coffee”)
Row 1: Ch 2, 6sc in first ch. (6sts)
Row 2: 2sc in each st around. (12 sts)
Finish off, leaving tail to sew to face.
*Tip: After you sew these to the face slightly above the snout, use two different sized buttons or other small round object to trace a circle on the black and white felt. These will be glued on top of the crocheted circles for the eyes. They can be glued or sewn, but I prefer just using Elmer’s glue (it’s very sturdy if left alone until completely dry).

Pug’s Tail (in “Buff”)
Row 1: Ch 13, sc in 2nd ch from hook and across to end (12 sts)
Row 2: Ch 1, turn, sc across (12 sts)
Row 3: do not ch1, turn, sl st in 1st st, sc across.
Finish off, fold in half (so that top of last row and beginning chain are touching), stitch to body and stitch folded edges together. Tail should curl by itself.